|
||||||||||||||||||||||||||||
|
|
||||||||||||||||||||||||||||
My DVD Maker Tutorial.Quick start. How to create a dvd using My DVD Maker: |
|
 |
1. Start My-DVD-Maker. then Press "Create DVD" button to begin converting. |
 |
2. Setup parameters Set up parameters such as selecting output directory, DVD parameters, create DVD menu, or not. Leave the default settings if you do not want to change them. The default settings will work well in most cases. After setting the parameters, press the "Next" button.
|
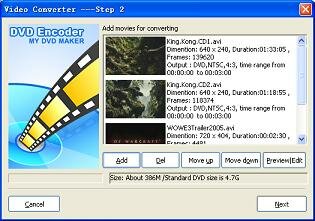 |
3. Add movies for converting Press the "add" button to add the movies you want to convert. My-DVD-Maker will capture a video frame for each movie. You can see the captured image above. Later, the program will generate a DVD Menu from these images. In this step, you can do some editing, such as changing the movie order, delete a movie from the list, or setup each movie's time range for encoding. After you finish this step, press the "Start" button to begin DVD encoding. |
 |
4. Design DVD Menu If you choose the option to create dvd menu( default setting is create dvd menu) , you can desgin the dvd menu in this step, you can adjust the size and the position of dvd menu button, the button template, change the background image, add text on it.
|
 |
5. Start DVD encoding. Now my dvd maker will help you to convert the video files to dvd. it first convert them to vob file, then authorize these vobs into dvd and create dvd menus. after finish it, you will get a dvd ready to burn on your hard disc. |
 |
6. Burn the DVD. Back to the main window and press the button labled "Burn DVD". the dvd burner will popup and find your dvd burner hardware automatically. if everything is ok, just press button Burn.
|
|
Copyright 2005-. MultiPower Software,Inc. All rights reserved.Protected by the copyright laws by international treaties. |
|||